How to Use a Fish Finder to Locate Crappie Brush Piles
It can be incredibly frustrating to spend a beautiful day on the water, only to come back with an empty livewell because you just couldn't pinpoint where those elusive crappie were hiding. Many anglers know crappie love to hang around submerged structure, especially brush piles, but actually finding those piles and the fish within them can feel like searching for a needle in a haystack. This guide will walk you through exactly how to harness the power of your fish finder to locate crappie brush piles and put more fish in your boat here in Mississippi.
Understanding Your Fish Finder for Crappie Hunting
Before you even launch the boat, it's crucial to understand the tools at your disposal. Modern fish finders are incredibly sophisticated, offering a suite of technologies designed to show you what’s beneath the surface. For crappie anglers, especially those targeting brush piles, knowing how to leverage each display type is paramount.
Different Types of Fish Finders and Their Displays
When you look at your fish finder screen, you're not just seeing one kind of sonar. Most units combine several technologies, each with its own strengths for detecting submerged structure and the fish holding tight to it.
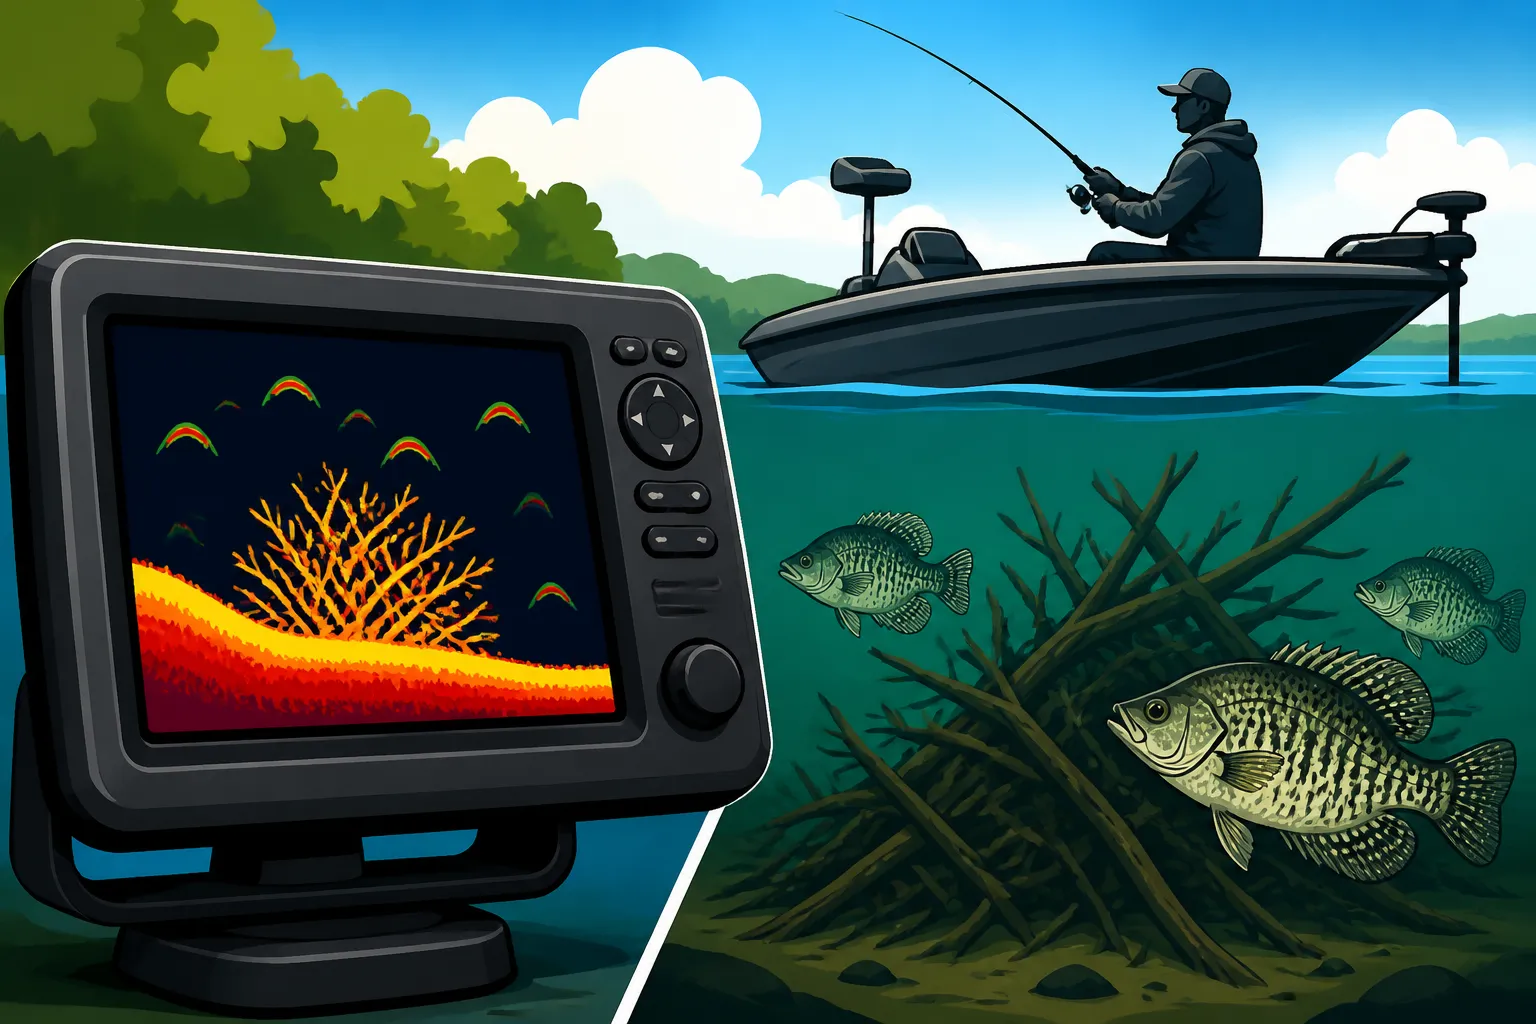
- 2D Sonar (Traditional Sonar): This is the classic view most people associate with fish finders. It sends a conical beam straight down, displaying returns as arches (fish) or solid shapes (structure). For brush piles, 2D sonar will often show a dense, irregular blob, sometimes with distinct arches or "dots" representing crappie nestled within or just above the cover. While it’s good for a general overview, it can sometimes be hard to differentiate between a truly fish-holding brush pile and just a dense snag without more detail. You’ll be looking for those tell-tale red, orange, or yellow colors that indicate stronger returns from fish.
- Down Imaging (DownScan/ClearVü): This technology provides a picture-like view directly below your boat, using a very thin, high-frequency beam. Instead of arches, fish appear as bright dots or streaks, and brush piles show up with incredible detail, often looking like actual underwater trees or piles of branches. Down Imaging is invaluable for confirming what you see on your 2D sonar, giving you a much clearer idea of the density and shape of the cover, and whether those marks you’re seeing are indeed crappie or just leaves and debris. This clearer imagery can really help distinguish a promising brush pile from general clutter.
- Side Imaging (SideScan/StructureScan): This is arguably the most powerful tool for locating brush piles over a wide area. Side Imaging sends beams out to the sides of your boat, mapping the bottom horizontally. This means you can scan large swaths of water quickly, identifying brush piles, submerged timber, and other structures off to your port or starboard. A good Side Imaging unit, especially popular brands like Humminbird or Garmin, will show a brush pile as a distinct shadow and return on the screen, often revealing its exact shape and size relative to the bottom. This is your primary search tool for covering water efficiently and locating potential hotspots before ever driving directly over them.
Essential Settings for Crappie Detection
Once you understand the different displays, knowing how to fine-tune your fish finder's settings is the next critical step. The default settings might be okay for open water, but for precision crappie fishing around brush, you'll want to make some adjustments.
- Sensitivity: This setting controls how strong a sonar return needs to be to show up on your screen. When searching for crappie in brush piles, you want your sensitivity high enough to pick up the fish, but not so high that it creates excessive clutter and noise. Start by turning it up until you see some noise, then back it down just slightly until the screen is clear but still showing good detail of the brush. Too low, and you'll miss those subtle crappie marks; too high, and you won't be able to tell fish from interference.
- Range and Frequency: The depth range needs to be set appropriately for the water you're fishing. If you’re in 20 feet of water, setting your range to 100 feet is inefficient. Keep it tight to the actual depth to maximize detail. Frequency is also important; lower frequencies (e.g., 50 kHz) penetrate deeper water but offer less detail, while higher frequencies (e.g., 200 kHz or megahertz for imaging) provide superior detail but have less depth penetration. For crappie in brush piles in typical Mississippi lakes, a higher frequency for your 2D sonar (like 200 kHz) combined with high-frequency imaging (like 800 kHz or 1.2 MHz) will give you the best picture of both the structure and the fish.
- Zoom: Don't overlook the zoom function! Once you've located a potential brush pile, zooming in on that specific depth range can greatly magnify the returns, making it much easier to distinguish individual crappie within the dense cover. This is especially useful when you're trying to figure out how many fish are actually in the pile and where they are positioned relative to the branches. You might use a 2x or 4x zoom to really dial in on the activity. Many anglers find their ideal fish finder on platforms like Amazon, where they can compare features and read reviews to ensure they get a unit with robust zoom capabilities.
Strategically Locating Crappie Brush Piles
Having a top-notch fish finder is only half the battle; knowing how to use it strategically to pinpoint those crappie havens is where true skill comes in. It’s about more than just driving around aimlessly; it’s about systematic searching and precise interpretation.
Interpreting Sonar Signals for Structure
Reading your fish finder effectively is an art form that comes with practice. Each sonar type offers unique clues to help you identify brush piles and the crappie holding to them.
- 2D Sonar Interpretation: On 2D sonar, a brush pile typically appears as a dense, irregular blob, often with a "Christmas tree" shape if it’s an upright structure like a submerged tree. The returns will usually be solid and colorful (yellow/red), indicating hardness. Crappie within or around the brush pile will show up as distinct arches or sometimes as dense clusters of dots, often suspended slightly above or within the denser parts of the structure. If you see a solid, dark return for the brush and then bright, distinct arches hovering nearby, you've likely found crappie. Don't confuse small baitfish schools, which appear as clouds or masses of tiny dots, with actual crappie.
- Down Imaging Interpretation: This is where the magic really happens for confirming brush piles. On Down Imaging, a brush pile will look remarkably like an actual pile of sticks and branches on the bottom. You’ll see the individual components of the structure. Crappie will appear as bright white dots or small streaks, often tightly clustered within the branches or holding just off the edges. The clarity here is exceptional; you can often count individual fish if they're not too densely packed. This view is fantastic for understanding the exact configuration of the cover and where the fish are positioned relative to it.
- Side Imaging Interpretation: When sweeping with Side Imaging, a brush pile will appear as a bright return (the object itself) with a corresponding dark shadow behind it on the opposite side from your transducer. The length and darkness of the shadow tell you about the object's height and density. The beauty of Side Imaging is that it allows you to spot these piles hundreds of feet to either side of your boat, letting you cover vast areas quickly. For instance, if you're exploring the wide expanses of Ross Barnett Reservoir, you can pick up multiple brush piles on a single pass, much more efficiently than relying solely on 2D or Down Imaging. Once you spot a promising pile, you can then turn the boat and slowly idle over it to get a detailed look with your Down and 2D sonar.
Grid Searches and Marking Waypoints
Effective crappie fishing with a fish finder isn't just about interpretation; it's about systematic searching and accurate record-keeping.
- Executing a Grid Search Pattern: To thoroughly cover an area suspected of holding brush piles, employ a grid search pattern. Start by moving in straight lines, perhaps 50-100 feet apart, using your Side Imaging to scan the area. Imagine mowing a lawn. Once you reach the end of a pass, turn the boat and make another parallel pass. This ensures you systematically cover the entire zone. This technique is especially useful in larger bodies of water like Grenada Lake or Sardis Lake where crappie can be widely dispersed. If you're exploring a new area, this methodical approach will save you countless hours.
- Marking Waypoints Accurately: The moment you spot a promising brush pile on your Side Imaging or when you idle over one with your Down Imaging showing fish, immediately mark a waypoint. Don't wait. Use your GPS functionality to drop a digital pin on that exact spot. Give it a descriptive name like "Crappie Pile 1" or "Brush Pile Deep" to help you remember its characteristics later. This waypoint becomes your roadmap back to the fish. When you’re ready to fish, you can easily navigate directly back to that marked spot, often with an anchor setting on your trolling motor keeping you perfectly positioned. This precision helps you present your lure right in the strike zone, especially when Jig Fishing for Crappie.
Advanced Tips for Maximizing Your Fish Finder's Potential
Becoming a true crappie hunting expert with your fish finder means moving beyond the basics. It's about refining your identification skills and integrating your sonar data with other crucial environmental factors.
Differentiating Between Brush Piles and Other Submerged Objects
One of the common challenges anglers face is distinguishing between crappie-holding brush piles and other underwater clutter that might look similar on the screen. Not every blob is a honey hole!
- Stumps vs. Brush Piles: On 2D sonar, a single stump might look like a small, dense blob. A brush pile, however, typically shows a more irregular shape, often taller and wider, with more broken-up returns indicating individual branches rather than a solid mass. With Down Imaging, the difference is stark: a stump will show a solid trunk and root system, while a brush pile will clearly display multiple intertwined branches. If you're looking for How to Find Bass Around Submerged Timber, the identification of stumps is equally critical.
- Rocks vs. Brush Piles: Rocks usually provide very hard, distinct returns on 2D and Down Imaging, often appearing as uniform, solid shapes on the bottom. Brush piles are softer and more irregular. Side Imaging can also help, as a rock pile will have a different textural appearance and shadow than a pile of branches. It's important to understand the typical bottom composition of the lake you're fishing; some areas naturally have more rock formations than others.
- Baitfish Schools vs. Crappie: This is perhaps the most common mistake. Baitfish schools (like shad) appear as dense clouds or balls of tiny dots on 2D sonar, often suspended in the water column. Crappie, especially larger ones, will show as more distinct arches or larger, more isolated dots, particularly when they're holding tight to structure. On Down Imaging, baitfish are typically tiny specks, while crappie are brighter, more pronounced dots. Pay attention to how the marks are behaving. Baitfish schools often move quickly and are less associated with stationary cover in the same way crappie are. Knowing the Best Time of Day to Catch Crappie can also help, as crappie movements often align with light conditions, while baitfish might be more sporadic.
Combining Fish Finder Data with Environmental Cues
Your fish finder provides an incredible snapshot of the underwater world, but it’s just one piece of the puzzle. The most successful crappie anglers integrate their sonar data with a keen understanding of environmental factors.
- Water Temperature and Depth: Crappie are highly sensitive to water temperature. Your fish finder often displays the surface water temperature, but understanding the thermocline (a distinct temperature layer) is also critical for deep crappie. In colder months, crappie might gravitate to deeper, more stable water, while during the spawn, they move much shallower. Knowing the Best Water Temperature for Crappie Fishing helps you predict the general depth range where you should be scanning for brush piles. If you're fishing in the summer, understanding How Deep Do Crappie Go in Summer will guide your search efforts, as they'll likely be seeking cooler, deeper sanctuaries.
- Seasonal Movements and Spawn: Crappie movements are largely dictated by the seasons. In spring, they'll be moving shallow to spawn, often using brush piles in 3-10 feet of water. In summer, they'll typically retreat to deeper brush piles or timber. Fall sees them moving around more, often suspending, while winter finds them relating to deep structure and channels. Your fish finder helps you locate the type of structure, but the season dictates where to start looking for that structure. Remember to always check the local rules, as Mississippi Crappie Regulations by Lake can vary, especially concerning spawning season closures.
- Current and Wind: Even in a reservoir, current can be a factor, especially near dam spillways or creek channels. Crappie often position themselves on the leeward side of brush piles, out of the main current, conserving energy while waiting to ambush bait. Wind also affects crappie by pushing baitfish. Look for brush piles on wind-blown banks or points where baitfish might be congregating. This combination of sonar and environmental observation makes you a much more effective angler.
| Sonar Type | Best for Locating Brush Piles | Best for Identifying Crappie in Brush Piles | Pros | Cons |
|---|---|---|---|---|
| 2D Sonar | General dense blobs, irregular shapes | Arches or clusters of dots within/above the blob | Good general overview, works well in deep water | Less detail, can be difficult to distinguish fish from clutter |
| Down Imaging | Picture-like detail of individual branches and structure | Bright, distinct dots/streaks tightly associated with branches | Excellent clarity, easy to confirm structure composition | Only scans directly below the boat, limited search area |
| Side Imaging | Wide area scanning, identifies objects as bright returns with shadows | Less ideal for precise fish identification, more for finding structure | Covers vast areas quickly, shows structure's shape and height | Requires practice to interpret, fish appear as small dots, not arches |
Using your fish finder effectively to locate crappie brush piles is a skill that will dramatically improve your success on the water. By understanding the different sonar technologies, dialing in your settings, strategically searching, and combining your readings with environmental knowledge, you’ll spend less time searching and more time reeling in those tasty Mississippi crappie. Whether you're trying out new techniques for Trolling for Crappie on Mississippi Reservoirs or exploring new depths, your fish finder is your most valuable companion. You might also want to consult guides like the Mississippi Fishing License Guide to ensure you're always fishing legally, and if you're targeting specific lakes, check out Sardis Lake Crappie Size Limit or Grenada Lake Crappie Daily Limit for local regulations. Remember, the key is practice and patience; the more time you spend interpreting your screen, the better you’ll become at finding those hidden crappie hotspots.
Disclaimer
Fishing regulations and conditions can change. Always consult the latest rules and advisories from the Mississippi Department of Wildlife, Fisheries, and Parks (MDWFP) before heading out on the water. This guide is for informational purposes only and does not constitute professional advice.